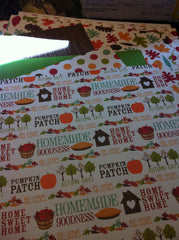
I used a couple of different design sheets to create the background for the card and the apple jar insert. I also used the Mason Jar stamp set from Your Next Stamp.
I stamped the jar image onto the apple paper and cut out the inside image of the jar for the jar contents.
I then stamped the jar again onto some pale blue/grey cardstock and cut the whole jar out for the jar image. I also stamped the jar top onto Wildberry - Bo Bunny Double Dot cardstock.
I then cut all of the images out.
And using one of each cutout for each jar, assembled the jars together, and tied some green cord around the jar tops.
I then cut 2 sheets of white cardstock to make 4'x8" pieces. I got 4 bases from each sheet by cutting first at 8", giving me an 8"x12" piece. Then cut at 4" and 8" on the 12" side to get (3) 4"x8" pieces. I used the remaining 4"x12" piece to create the last 4"x8" base. (I had a 4"x4" piece left over). I then scored each base at 4" along the 8" side to create (8) 4"x4" bases. I also cut a green mat at 3 7/8" and the brown wood grain design paper at 3 3/4" for the card front.
I then cut some plain white cardstock into (8) 1 1/2"x3" and one more 6x6 patterned paper to make (8) 1 1/4"x3".
I layered the small pattered paper pieces over the white cardstock and lined up the 3" edges.
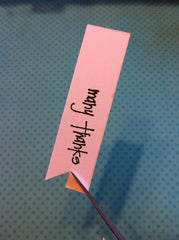
Then I cut (8) 3/4"x2 1/2" pieces from white cardstock for the "Many Thanks" banners.
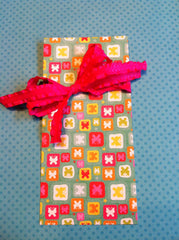
Then using a glue dot (zots) to hold my first knot for my "bow", I wrapped a length of ribbon (ribbon from my stash) around my fingers a few times to create a "layered" bow.
I put the ribbon layers over top of my first knot and used the knot tails to tie around the ribbon layers to hold them. (you can always use another glue dot to hold that knot so it is less likely to undo)
And here you have a "layered' bow!
Now, I really like layers on my projects so I used foam squares on the main patterned paper to pop it up, in addition to the smaller layer.
I then layered the main patterned paper onto the orange cardstock, and the smaller mat on top of that, just under the bow.
I took the sentiment from the Bloom Beautifully Stamp set (coming soon), and stamped it onto the white cardstock (3/4"x2 1/2"), leaving some space on either end to add a decorative brad and banner end.
An easy way to make a banner end, is to cut down the center of the paper where you want the cutout, and then cut from each corner to the center of the banner.
I then pierced a hole for the brad in the center between the left side of the banner and where the sentiments begins, inserted the brad and bent back it's prongs.
And then again using foam squares for dimension, I adhered the banner to the small mat on the front of the tag.
So there you have it! With a small amount of supplies, I was able to make 8 Thank You Tags for some very special people! ;)
Hope you like the tags and hope they bring you inspiration!!!
Today I was up to some crafting, I needed to make a card to give to my husband for our anniversary coming up on Monday. I thought I would share how I went about the "card making process", and maybe give someone out there some inspiration. I started out with a couple of sheets of American Crafts cardstock, a sheet of patterned paper from the Prima Stationer's Desk 12x12 Collection and a cut out from the collection's ATC pages, and a couple of tags from the Tag Me Pack. I also used some Tim Holtz seam-binding ribbon for the bow.
I took the edge of my scissors and scraped all the edges of each paper to makes them look worn. I then inked all the edges with a cocoa colored ink using a sponge so the pages will blend together nicely.
This is the worn look that the scissors give the papers when complete.
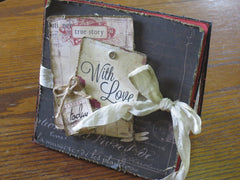
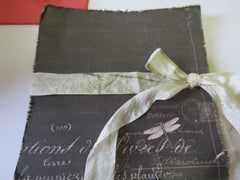
This is the collection of papers that I used to assemble the card. I added a bit more inking to the center of the "With Love" card, "today" tag, and "true story" ATC as I wanted them to have less white showing on them. I matted the black dragonfly paper with red cardstock to make it pop a bit more, as the red was used in the collection from the flowers, and scroll work.
To distress the seam-binding ribbon a little, all I did was take the same ink pad that I was using for distressing the paper and ran it over the length of the ribbon to add some color. Then I enclosed the inked ribbon in a small plastic zipper bag with a little bit of water to help blend the color of the ink throughout the ribbon. You can also achieve this by adding a couple of drops of re-inker to a small amount of water in zipper bag and wrinkle it around inside the bag to give the ribbon some color. Ring out the excess water, straighten the ribbon and let dry.
Once the ribbon was dry, I tied a ribbon around the front piece of the card before attaching it to the red mat.
I really like dimension on my cards, so I like to pop the layers up with foam squares, which also helps when using ribbon, as it doesn't bulk up the card front if you were to lay the front directly over top of the ribbon.
I also distressed a couple of sheets of cardstock for the inside of the card, using the same process as the front papers.
I didn't end up using many embellishments, as I wanted to keep the card fairly masculine, but it is a card to show how much I love my dear sweet hubby, so a little doesn't hurt (ei: the bows).
I hope you enjoy this post and that it brings some inspiration your way.
Below I have included a list of the products used.
Do separate orders each day using the corresponding collections found in the "Shop" tab and "Brands" tabs. A https://www.prairiepaperhaven.com/ https://www.prairiepaperhaven.com/collections/graphic-45 https://www.prairiepaperhaven.com/collections/pinkfresh https://www.prairiepaperhaven.com/collections/8x8-paper https://www.prairiepaperhaven.com/collections/doodlebug-designs https://www.prairiepaperhaven.com/collections/kaisercraft https://www.prairiepaperhaven.com/collections/tools https://www.prairiepaperhaven.com/collections/bo-bunny https://www.prairiepaperhaven.com/collections/paper-rose https://www.prairiepaperhaven.com/collections/stamps https://www.prairiepaperhaven.com/collections/american-crafts...